Before you power up your Prusa Mendel for the basic control checks, I suggest you move the extruder to the center of the heat bed and make sure it's at least an inch above the heat bed. This will allow it to move freely in any direction.
Once you've downloaded the software and uploaded the firmware, it's a good idea to test to make sure that you've wired up your Prusa correctly. At this point in time you should be able to exercise your printer's functions from your PC. You can use a piece of software that you've downloaded called Pronterface. Pronterface is a terrific tool for exercising the various devices on your Prusa, plus it will be used to upload your designs to the Prusa for printing.
Here is a list of items you can check:
- X axis direction and limit switch.
- Y axis direction and limit switch
- Z axis direction for both motors, limit switch
- Extruder direction
- heat bed and heat bed thermistor
- hot end resistor and hot end thermistor
Note: I found it helpful to have a heat probe available to troubleshoot the temperature functionality. I use a Fluke 80BK-A probe along with a fluke 179 DVM.
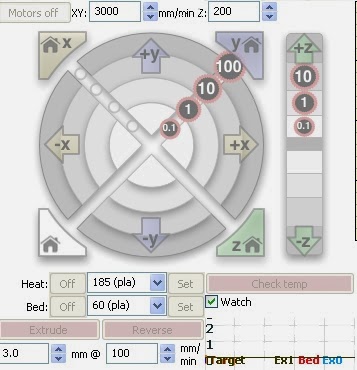
With your Prusa Mendel powered up and connected to your PC, click on the Pronterface icon to get started:
Make sure that the Port is set appropriately for your configuration, set the port bit rate to 250000 bps and
click "Connect"
 |
| Setting the port, bit rate and initiating the connection |
Now you should see the text of the "Connect" button has changed to "Disconnect" and the controls change from grayed out to enabled:
 |
| Controls are enabled (printer is connected) |
 |
| Controls are disabled (printer is disconnected) |
The controls allow you to move any axis by 0.1, 1, 10 or 100 mm. I suggest starting out with 1 mm moves for the testing you're about to do. 1 mm is enough to see with your eye, but not too much to cause damage if something goes wrong.
 |
| Control to move x axis 1 mm in the negative direction |
 |
| Control to move y axis 1 mm in the negative direction |
 |
| Control to move z axis 1 mm in the negative direction |
For any given axis, the limit switch represents the minimum value. This means that clicking on "-x" or "-y" or "-z" buttons should move the extruder closer to the limit switch. So "-x" should move the extruder to the right, "-y" should move the heat bed toward you and "-z" should move the extruder downward, toward the heat bed. If you're seeing the opposite, simply pull the connector for the relevant stepper motor, turn it 180 degrees and plug it back in. During the assembly of my Prusa Mendel, I discovered that I had to do this for my X, Y and Z stepper motors. Alternatively, there is a setting in the Configuration.h file of the firmware that can accomplish this.
To check a limit switch, simply use the Pronterface controls to move the extruder in the negative direction until it activates the limit switch. You should hear a click as the limit switch activates. Further movement in the negative direction should be suppressed. At this point in time, the Z limit switch has not been precisely positioned/calibrated so you'll have to adjust the Z axis limit switch to some reasonable height where it can be activated.
Clicking on the "Extrude" button should turn the large wheel in a counter-clockwise direction when viewed from the front.
 |
| Extruder control |
 |
| "Set" button and Temperature gauge for hot end resistor. |
Similarly, to the the heat bed, click the appropriate "Set" button and look for the "Bed" temperature gauge to start rising. If you soldered the surface mount LEDs and resistor to your heat bed, you should see one of the LEDs light up now. Click the "Off" button near the "Set" button to turn off the heat bed. The heat bed will remain warm for some time after you turn it off.
 |
| "Set" button and Temperature gauge for heat bed |
One thing to note is that I haven't figured out how to test the little fan that cools the extruder using Pronterface.
When finished, click the "Disconnect" button and exit Pronterface.
No comments:
Post a Comment